
Stuffed Pears with Blue Cheese: A Deliciously Decadent Treat
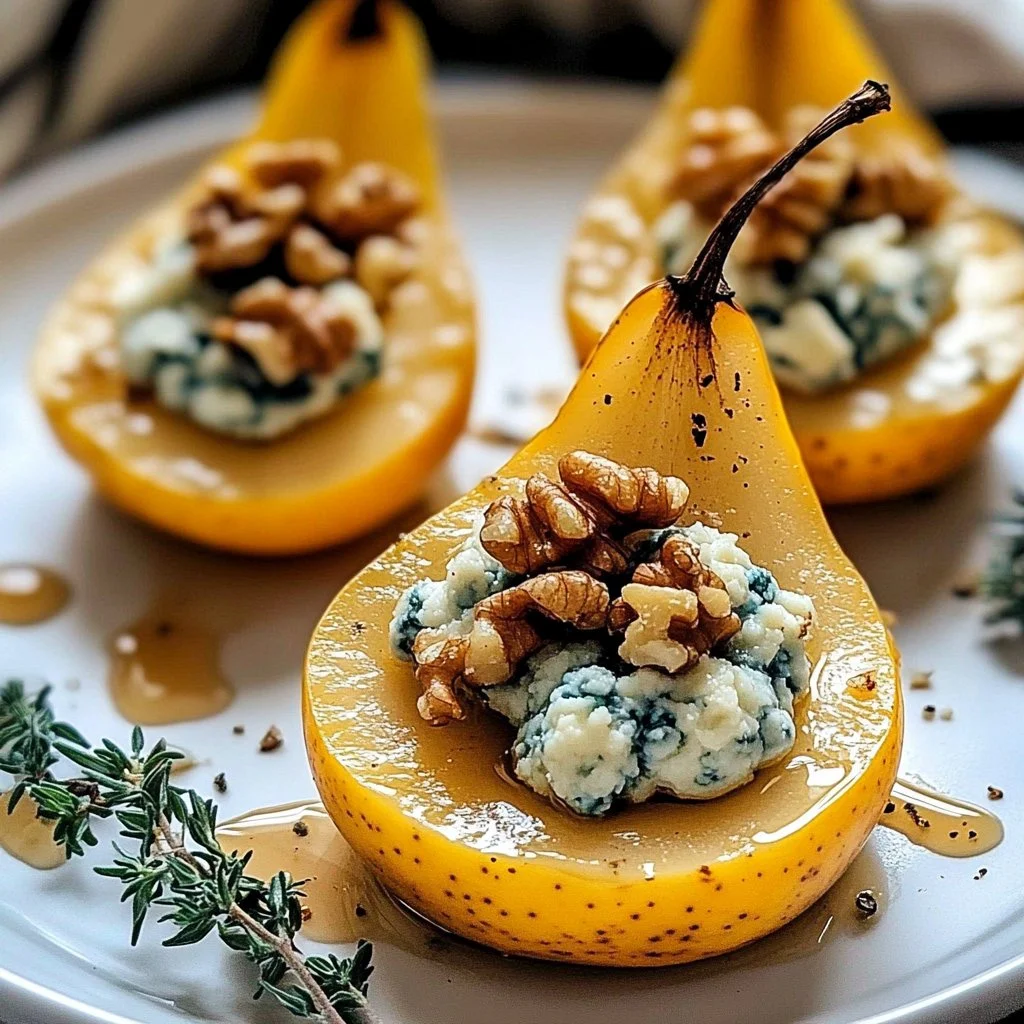
There’s something singularly special about the aroma of baked pears wafting through the kitchen. Stuffed Pears with Blue Cheese bring an enticing balance of sweet and savory that can uplift any gathering or a cozy moment at home. Imagine the warm, tender pear enveloping a creamy, rich filling that oozes a combination of blue cheese and toasted walnuts, drizzled with golden honey – a dish that tantalizes your taste buds and stirs your soul.
This delectable recipe is quick and straightforward to whip up, making it an ideal indulgence for a weeknight dessert or a delightful touch to your holiday table. Imagine sinking your fork into one of these gorgeous pears, the creamy filling melting into a flavor explosion. The best part? This gourmet dish requires minimal effort while delivering maximum satisfaction.
What’s Your Favorite Comfort Dessert?
Have you ever found yourself reminiscing about that one dessert that brought you unbridled joy? Perhaps it was the warm, gooey filling of a fruit tart, or a rich chocolate lava cake? What if I told you that Stuffed Pears with Blue Cheese could offer you the same nostalgic comfort?
These pears blend the richness of blue cheese with the sweetness of honey and walnuts, creating an unforgettable memory in each bite. Whether enjoying them after a long day or sharing them with loved ones, there’s something intimately satisfying about indulging in a dish that resonates with the heart.
Why You’ll Love This Recipe
Easy Prep: Whip these up in under 30 minutes, making it perfect for last-minute gatherings or cozy nights in.
Crowd-Pleaser: This unique combination of flavors will intrigue and please a variety of palates, leaving everyone wanting more.
Minimal Ingredients: Find many of these pantry staples at home, making this both a convenient and delightful option.
Impressive Presentation: Serve these rustic yet elegant stuffed pears to wow your guests without spending hours in the kitchen.
Ingredients
The Build-Up to Flavor Town
Ripe Pears: Choose pears that yield slightly when pressed; they should be fragrant and free from bruises. This is the vessel for your tantalizing filling.
Blue Cheese: The star ingredient! Select a creamy, high-quality blue cheese that melts beautifully, creating an irresistible filling that balances the sweetness of pears.
Chopped Walnuts: Providing a delightful crunch and nutty aroma, walnuts enhance texture and flavor, taking this dish to new heights.
Honey: Drizzling this sticky golden nectar adds a luscious sweetness that contrasts beautifully with the tangy cheese.
Balsamic Vinegar: A splash of balsamic adds a sophisticated, earthy depth to the dish that enhances all the flavors.
Ground Black Pepper: This isn’t just seasoning; it’s a subtle heat that rounds off the sweet and savory notes.
Fresh Thyme Sprigs: A touch of color and fragrance, thyme pairs beautifully with both the pears and cheese, tying the dish together.
Timing
Quick Yet Indulgent
These stuffed pears are the ultimate express route to gourmet with just a few minutes of prep and around 25 minutes in the oven. In less than an hour, you can have a stunning dessert on your table. Whether you took the fast lane or planned ahead for a lavish dinner, your guests will never suspect you made this treat with such ease.
Step-by-Step
Crafting Your Culinary Delight
Prepare The Pears: Carefully slice the pears in half and use a melon baller or spoon to scoop out the cores, leaving the stems on if possible. Place each half cut side up on a parchment-lined baking sheet, creating little cups ready for their sumptuous filling.
Make The Filling: In a small mixing bowl, combine the blue cheese crumbles, toasted walnuts, and a tablespoon of honey. Mix until the walnuts are evenly coated, and the cheese sticks together. The creamy texture and robust aroma make this filling truly irresistible.
Stuff The Pears: Spoon the cheese and nut mixture into the center cavity of each pear half. Press gently, so the filling holds its shape. Imagine the satisfaction of tucking each mound of cheesy goodness into the nestled fruit.
Season And Bake: Drizzle balsamic vinegar over the stuffed pears. Sprinkle a pinch of black pepper over each half. Bake at 375°F for twenty to twenty-five minutes until the pears are tender, and the cheese is bubbling, releasing a heavenly scent that fills your kitchen.
Serve And Garnish: Once baked, remove the pears from the oven and let them stand for a minute (if you can resist!). Drizzle each pear with extra honey and top with a fresh thyme sprig for a burst of color. Serve warm, and watch as everyone dives in.
Nutritional Information
With each stuffed pear averaging around 200 calories, you’re enjoying a delightful dessert that feels indulgent yet provides a balance of nutrition. The natural sweetness from the fruit, combined with the heartiness of nuts and cheese, brings satisfaction without overwhelming your palate. Remember, it’s always nice to indulge from time to time!
Healthier Alternatives
Craving a lighter option? For a low-sugar alternative, swap out honey for agave nectar or use unsweetened apple sauce in the filling to keep it moist without the additional sugar.
Looking for dairy-free? Substituting vegan blue cheese made from cashews or coconut can give you that creamy texture without the dairy elements, making it an accessible dessert for everyone.
Serving Suggestions
Imagine these succulent stuffed pears served warm with a scoop of vanilla ice cream, melting into gooey bliss. Perfect for chilly evenings, these are also wonderful served alongside a glass of your favorite dessert wine or as a sweet finish to a holiday feast.
The contrast of warm, baked fruit with a chilled treat like ice cream creates a divine experience that your guests won’t soon forget.
Common Mistakes
When creating your stuffed pears, keep an eye on them while baking. Overbaking can lead to mushy pears, which isn’t ideal.
Additionally, be cautious with the filling texture; too little mixing can create clumps instead of a cohesive stuffing. Lastly, avoid making a mess by placing the pears on a lined baking sheet.
Storing Tips
Leftover stuffed pears can be stored in the fridge for up to three days in an airtight container. For freezing, cool them completely before wrapping them tightly in plastic wrap followed by aluminum foil.
To reheat, place them in a preheated oven set to 350°F until warmed through, or microwave in 15-second intervals, watching carefully to maintain that perfect texture.
Tempting Conclusion
Your dessert table doesn’t know what it’s missing until you introduce these Stuffed Pears with Blue Cheese. Easy, indulgent, and loaded with flavor, they are an elegant way to impress guests or treat yourself.
So why wait? Get into your kitchen and whip up these juicy, mouth-watering delights today!
FAQs
Can I use other cheeses?
Yes! Consider using goat cheese or feta for a lighter alternative.What types of pears work best for this recipe?
Bartlett or Bosc pears are ideal due to their sweet and juicy nature.Can I prepare these in advance?
Absolutely! Stuff the pears a few hours ahead and bake just before serving.Is this recipe suitable for vegetarians?
Yes, this recipe is vegetarian-friendly.Can I replace nuts for allergies?
Certainly! You can omit the walnuts or use seeds like sunflower or pumpkin for a nut-free option.
Now you’re all set with the ultimate indulgent dessert. Enjoy!

Stuffed Pears with Blue Cheese
Ingredients
For the stuffed pears
- 4 pieces Ripe Pears Choose pears that yield slightly when pressed.
- 100 grams Blue Cheese Select a creamy, high-quality blue cheese.
- 50 grams Chopped Walnuts Toasted for enhanced flavor.
- 2 tablespoons Honey For drizzling over the stuffed pears.
- 1 tablespoon Balsamic Vinegar Adds depth to the dish.
- 1/4 teaspoon Ground Black Pepper For added flavor.
- 4 sprigs Fresh Thyme For garnish and flavor pairing.
Instructions
Preparation
- Preheat oven to 375°F (190°C).
- Carefully slice the pears in half and scoop out the cores, keeping stems if possible. Place cut side up on a parchment-lined baking sheet.
Filling
- In a mixing bowl, combine blue cheese, chopped walnuts, and 1 tablespoon of honey. Mix until walnuts are coated and cheese is slightly combined.
Assembly and Baking
- Stuff the pear halves with the cheese and walnut mixture, pressing gently to hold shape.
- Drizzle balsamic vinegar over the stuffed pears and sprinkle with black pepper.
- Bake in the preheated oven for 20-25 minutes until pears are tender and cheese is bubbly.
Serving
- Remove from oven and let stand for a minute. Drizzle with extra honey and garnish with fresh thyme sprigs. Serve warm.


