
Philadelphia Cherry Cheesecake is a delightful dessert that combines creamy richness with the vibrant sweetness of fresh cherries. This recipe captures the essence of comfort food, making it the perfect end to any meal or a delightful treat for gatherings. With its creamy texture and tangy-sweet flavor, each slice evokes nostalgia and warmth, reminding us of family celebrations and sunny afternoons. Not only is Philadelphia Cherry Cheesecake easy to make, but it’s also sure to please any crowd, making it a must-try for both novice and experienced bakers alike. With this step-by-step guide, you’ll be on your way to mastering this delicious cheesecake in no time.
Why You’ll Love This Recipe
This Philadelphia Cherry Cheesecake will win you over for several reasons. First and foremost, the preparation is incredibly simple, requiring minimal effort while delivering maximum flavor. The combination of Philadelphia cream cheese and sour cream results in a silky and rich filling that melts in your mouth. Additionally, the use of fresh cherries gives the dessert a burst of juicy sweetness that beautifully balances the creamy cheesecake. It’s a fantastic crowd-pleaser, ideal for parties, holidays, or a cozy family dinner. Best of all, with straightforward ingredients and clear steps, this recipe is accessible for bakers of all skill levels.
Ingredients
To create this sumptuous Philadelphia Cherry Cheesecake, you will need the following ingredients:
- 1 1/2 cups graham cracker crumbs: These will form a deliciously crispy base that perfectly complements the creamy filling.
- 1/4 cup sugar: For added sweetness to the crust.
- 1/4 cup unsalted butter, melted: This binds the crust together and adds richness.
- 3 cups Philadelphia cream cheese, softened: The star of the show, bringing a luscious, creamy texture.
- 1 cup sour cream: Adds a tangy flavor and depth to the cheesecake filling.
- 1 cup granulated sugar: Sweetens the mixture to perfection.
- 2 teaspoons vanilla extract: Enhances the overall flavor with its aromatic essence.
- 1 tablespoon lemon juice: Provides a refreshing brightness to balance the richness.
- 4 large eggs: Essential for achieving a beautifully set cheesecake.
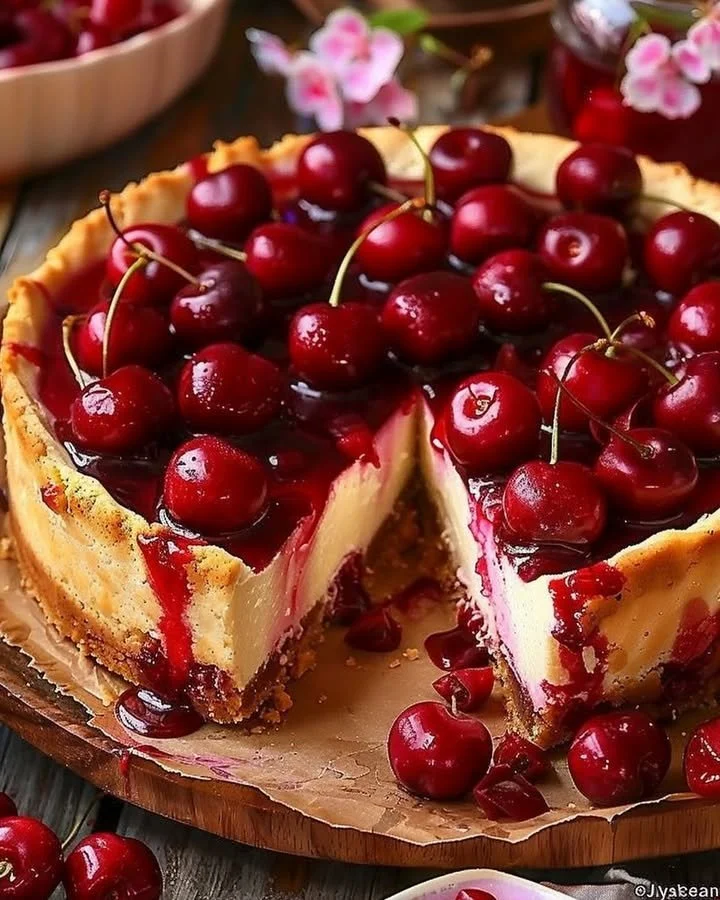
- 2 cups fresh cherries, pitted and halved: The juicy crown on the cheesecake, offering a fresh and fruity contrast.
- 2 tablespoons cherry juice: Enhances the flavor of the topping.
- 1/4 cup powdered sugar (for the cherry topping): To sweeten and stabilize the whipped cream.
- 1/4 cup heavy whipping cream: For deliciously fluffy whipped cream topping.
Step-by-Step Directions
Preheat the Oven: Begin by preheating your oven to 325°F (165°C). This ensures that your cheesecake bakes evenly.
Prepare the Crust: In a medium bowl, combine the graham cracker crumbs, sugar, and melted butter. Mix until the crumbs are well moistened. Press this mixture firmly into the bottom of a 9-inch springform pan. Bake for 10 minutes, then allow it to cool.
Make the Cheesecake Filling: In a large bowl, beat together the softened Philadelphia cream cheese, sour cream, granulated sugar, vanilla extract, and lemon juice until smooth and creamy. This should take about 2-3 minutes of mixing.
Incorporate the Eggs: Add the eggs one at a time, mixing thoroughly after each addition until fully incorporated. This step is crucial for a smooth texture.
Pour the Mixture: Once your filling is mixed, pour it over the cooled crust. Gently tap the pan on the counter to release any air bubbles that may have formed.
Bake: Place the cheesecake in the preheated oven and bake for 50-60 minutes. The center should be set but still slightly jiggly when you take it out.
Cool and Chill: Allow the cheesecake to cool at room temperature before transferring it to the refrigerator. Chill for at least 4 hours, or overnight for best results.
Prepare the Cherry Topping: In a small bowl, combine the fresh cherries and cherry juice. Let them sit for about 10 minutes to release their natural juices.
Whip the Cream: Whip the heavy cream and powdered sugar together until stiff peaks form. This light and airy topping is the perfect contrast to the dense cheesecake.
Assemble the Dessert: Once your cheesecake has chilled, spread the whipped cream on top and spoon the cherry mixture over it.
Serve: Enjoy your cheesecake chilled, and watch as everyone raves about your delicious creation!
Tips & Tricks
To enhance the flavor of your Philadelphia Cherry Cheesecake, consider adding a touch of almond extract to the filling for a lovely nutty undertone. Additionally, if you’re using frozen cherries, make sure to thaw and drain them properly to avoid excess moisture. Furthermore, to avoid cracks on the surface of your cheesecake, bake it in a water bath. This simple trick helps to regulate temperature and moisture, resulting in a perfectly smooth finish.
Serving Suggestions & Pairings
This Philadelphia Cherry Cheesecake is versatile in its serving suggestions. It shines as a star dessert for birthday parties, holiday celebrations, and family gatherings. Paired with a dollop of whipped cream or a scoop of vanilla ice cream, this cheesecake becomes even more indulgent. For a refreshing contrast, serve it alongside hot coffee or a cup of spiced tea to balance the sweetness. You can also present it with a side of additional cherry compote for guests who crave even more cherry flavor.
Nutritional Information
This Philadelphia Cherry Cheesecake serves approximately 8-10 people, making it perfect for sharing. Each slice contains roughly 400-450 calories, depending on serving size and specific ingredients used. It’s worth noting that this dessert, while indulgent, can fit into a balanced diet when enjoyed in moderation. Despite its decadence, the inclusion of fresh cherries adds antioxidants and vitamins, contributing to its appeal.
Storing Tips & Variations
To store any leftover cheesecake, cover it tightly with plastic wrap or foil to prevent it from drying out. Store it in the refrigerator for up to 4-5 days. For longer storage, freeze individual slices by wrapping them in plastic wrap and placing them in an airtight container. They can be frozen for up to 2-3 months. You can also experiment with variations — try using other fruits like blueberries or strawberries, or even a chocolate cookie crust for a fun twist.
Conclusion
Philadelphia Cherry Cheesecake is an iconic dessert that brings together rich flavors and enjoyable textures that are sure to impress. It’s an exceedingly approachable recipe that anyone can make, regardless of skill level. We encourage you to give this recipe a try, whether for a special occasion or just a sweet treat at home. Don’t forget to share your baking experience and any tweaks you make along the way!
FAQs
Can I use low-fat cream cheese?
Yes, low-fat cream cheese can be used, but be aware that it may slightly alter the texture and flavor of the cheesecake.How long does cheesecake need to chill?
It’s recommended to chill the cheesecake for at least 4 hours, but for the best texture and flavor, overnight is ideal.Can I make this cheesecake ahead of time?
Absolutely! This cheesecake can be made a day or two in advance and refrigerated until ready to serve.What if I don’t have fresh cherries?
If fresh cherries aren’t available, you can use canned or frozen cherries. Just make sure to drain them well.How can I tell when the cheesecake is done?
The cheesecake is done when the edges are set, and the center is slightly jiggly. It will firm up as it cools.


