
Easter No-Bake Mini Cheesecakes
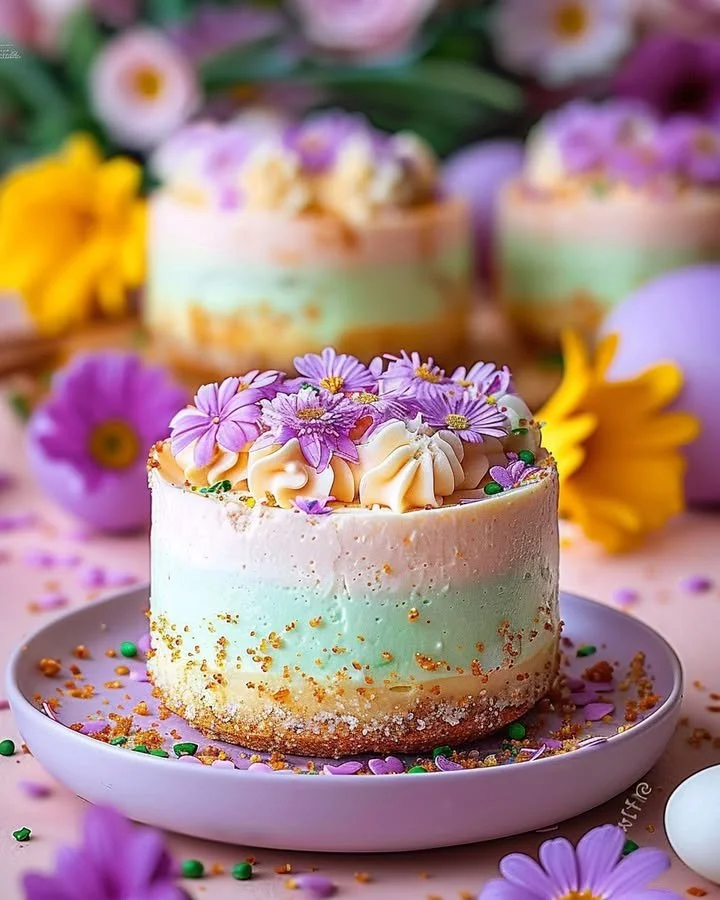
Delight in the wonder of Easter with these captivating Easter No-Bake Mini Cheesecakes, an exquisite treat that enchants the senses. Bursting with creamy textures and embellished with delightful pastel colors akin to spring blooms, this dessert captures the essence of joy and celebration. The subtle sweetness paired with the rich, tangy cream cheese creates a harmonious melody of flavors. As you step into the world of this recipe, follow along with the step-by-step directions, transforming simple ingredients into a delectable masterpiece perfect for any festive table.
History / Fun Fact
The tradition of celebrating Easter with special sweets and desserts dates back centuries, intertwining religious symbolism with seasonal festivities. While the exact origins are unclear, it is believed that cakes and pastries symbolizing new life and resurrection have been part of Easter celebrations since ancient times. The cheesecake itself has roots in ancient Greece, where it was served to athletes during the first Olympic Games. Over time, these creamy delights have evolved, and today, the no-bake variant has gained popularity for its simplicity and convenience, making it the perfect choice for Easter gatherings.
Ingredients
Crafting these delightful mini cheesecakes begins with a harmonious blend of ingredients that evoke a sense of comfort and joy. Start with 1 cup of graham cracker crumbs or crushed digestive biscuits, providing that perfect crunchy texture. Add 3 tablespoons of melted unsalted butter and 2 tablespoons of sugar, which can be optional but adds a gentle sweetness to the crust. The star of this recipe is 8 ounces of softened cream cheese, celebrated for its rich and creamy consistency. Complement this with ½ cup of powdered sugar and a teaspoon of aromatic vanilla extract, enhancing the overall flavor profile. Whip up 1 cup of cold heavy whipping cream to create that light, airy filling, and if desired, incorporate pastel food coloring in shades of pink, yellow, green, or purple to bring these mini cheesecakes to life. Finally, for those who love decoration, gather Easter candies such as mini eggs, jelly beans, or chocolate bunnies, and an optional swirl of whipped cream to crown your creation.
Cooking Time & Tips For Easter No-Bake Mini Cheesecakes
When it comes to preparing these charming mini cheesecakes, the method you choose can influence the final outcome. Quick preparation allows you to whip up these treats in a flash, making them perfect for last-minute gatherings. On the other hand, a slower approach allows flavors to meld beautifully, enhancing the creamy richness of the cheesecake. Regardless of your method, the key to success lies in ensuring your cream cheese is at room temperature to achieve a smooth filling. Additionally, be diligent in folding the whipped cream gently into the cheese mixture to maintain that coveted airy texture.
Step-by-Step Directions
Prepare the Crust: Dive into the exciting world of baking by mixing the graham cracker crumbs, melted butter, and sugar in a bowl until fully combined. Line a 12-cup muffin tin with decorative paper liners, and firmly press 1 tablespoon of this crumbly mixture into the base of each liner. Once done, slide the tin into the refrigerator to chill while you move on to the cheesecake filling.
Make the Cheesecake Filling: In a large mixing bowl, unite the softened cream cheese with powdered sugar and vanilla extract, then beat the mixture until it’s smooth and creamy, evoking a luxurious texture. In a separate bowl, whip the cold heavy cream until stiff peaks form, showing you that airy goodness is on the way. Gently fold the whipped cream into the cream cheese mixture, combining them seamlessly for a light, fluffy filling.
Add Colors (Optional): Embrace your inner artist by dividing the cheesecake filling into 3-4 bowls. Introduce a few drops of pastel food coloring into each and mix until evenly colored, transforming your creamy concoction into a rainbow of delight.
Assemble the Mini Cheesecakes: Spoon the vibrant cheesecake filling over the chilled crusts, layer colors creatively if desired, and smooth the tops with a spoon for that professional finish. Each layer tells a story of flavor and beauty.
Chill and Decorate: Allow your mini cheesecakes to rest in the refrigerator for at least 2-3 hours or until set. Before the grand reveal, adorn each mini cheesecake with charming Easter candies and a swirl of whipped cream if you please, creating a feast for both the eyes and the palate.
Serving Suggestions & Occasions
These Easter No-Bake Mini Cheesecakes shine brightly at any festive occasion. They’re perfect for Easter brunches, spring picnics, family gatherings, or simply as a delightful dessert after a cozy dinner. Their eye-catching presentation and individual servings make them a hit at parties, encouraging guests to indulge without hesitation. Pair them with a light herbal tea or a refreshing lemonade, and watch as their vibrant flavors elevate the entire experience.
Common Mistakes For Easter No-Bake Mini Cheesecakes
In your quest to create these delightful treats, be cautious of a few common pitfalls. One mistake is using cold cream cheese directly from the fridge; always allow it to soften to room temperature for a smooth, lump-free filling. Additionally, overmixing the filling can lead to a dense texture, so aim to blend until just combined. Forgetting to chill the crust adequately can result in a soggy base, so ensure that each layer has ample time to set. Finally, resist the temptation to skip the whipped cream folding step—this lightens the filling and enhances the overall dessert.
Healthier Alternatives & Variations
If you’re looking to lighten your Easter No-Bake Mini Cheesecakes or cater to specific dietary needs, consider these alternatives. Swap the graham cracker crust for a nut-based crust, using ground almonds or oats combined with dates for a wholesome base. Opt for low-fat cream cheese or a dairy-free cream cheese alternative to cater to dietary restrictions. For a natural sweetener, you can use honey or maple syrup instead of powdered sugar. And, for an adventurous twist, incorporate flavors like lemon or matcha into your cheesecake filling, resulting in unique variations that excite the taste buds.
FAQs
Can I make these mini cheesecakes ahead of time?
Absolutely! These mini cheesecakes can be made a day in advance. Just make sure to store them in an airtight container in the refrigerator until you’re ready to serve.How long do these mini cheesecakes last?
When stored in the refrigerator, these cheesecakes can last for about 3-5 days.Can I freeze the mini cheesecakes?
Yes! You can freeze them for up to a month. Just make sure to wrap them tightly and allow a few hours to thaw in the refrigerator before serving.What should I do if my whipped cream isn’t stiffening?
Ensure that your heavy cream is cold, and use a clean mixing bowl and whisk. It also helps to start at a low speed and gradually increase the speed to incorporate air.Can I add other flavors to the filling?
Yes! Feel free to mix in flavors like lemon zest, chocolate, or different extracts to customize your cheesecakes.What if I can’t find pastel food coloring?
Pastel colors can be achieved using natural food colorings or by using smaller amounts of regular food coloring, adjusting for your preferred shade.
Conclusion
Don’t wait any longer—transform your kitchen into a joyful space filled with the aromas of spring as you create these delightful Easter No-Bake Mini Cheesecakes. With the ease of no-bake preparation and the endless possibilities for creativity, these treats are bound to become a favorite in your home. Harmonizing simplicity, flavor, and visual appeal, they beckon you to experience the joy of cooking this Easter. Grab your ingredients and let the celebration begin!
Print
Easter No-Bake Mini Cheesecakes
- Total Time: 180 minutes
- Yield: 12 servings 1x
- Diet: Vegetarian
Description
Delight in these captivating Easter No-Bake Mini Cheesecakes, bursting with creamy textures and adorned with pastel colors to celebrate the season.
Ingredients
- 1 cup graham cracker crumbs or crushed digestive biscuits
- 3 tablespoons unsalted butter, melted
- 2 tablespoons sugar (optional)
- 8 ounces cream cheese, softened
- ½ cup powdered sugar
- 1 teaspoon vanilla extract
- 1 cup cold heavy whipping cream
- Pastel food coloring (pink, yellow, green, purple – optional)
- Easter candies (mini eggs, jelly beans, chocolate bunnies – for decoration)
- Whipped cream (optional, for topping)
Instructions
- Prepare the crust: Mix the graham cracker crumbs, melted butter, and sugar in a bowl until combined. Line a muffin tin with paper liners and press 1 tablespoon of the mixture into each. Chill the tin in the refrigerator.
- Make the cheesecake filling: In a bowl, beat together the cream cheese, powdered sugar, and vanilla until smooth. In another bowl, whip the heavy cream until stiff peaks form, then gently fold it into the cream cheese mixture.
- Add colors (optional): Divide the cheesecake filling into 3-4 bowls and add pastel food coloring to each, mixing until desired colors are achieved.
- Assemble the mini cheesecakes: Spoon the filling over the chilled crusts, layer colors if desired, and smooth the tops.
- Chill and decorate: Refrigerate the cheesecakes for at least 2-3 hours until set. Before serving, decorate with Easter candies and whipped cream if desired.
Notes
Ensure cream cheese is at room temperature for a smooth filling and fold whipped cream gently to maintain airiness.
- Prep Time: 30 minutes
- Cook Time: 0 minutes
- Category: Dessert
- Method: No-Bake
- Cuisine: American
Nutrition
- Serving Size: 1 cheesecake
- Calories: 250
- Sugar: 15g
- Sodium: 250mg
- Fat: 18g
- Saturated Fat: 10g
- Unsaturated Fat: 8g
- Trans Fat: 0g
- Carbohydrates: 20g
- Fiber: 1g
- Protein: 3g
- Cholesterol: 40mg


