
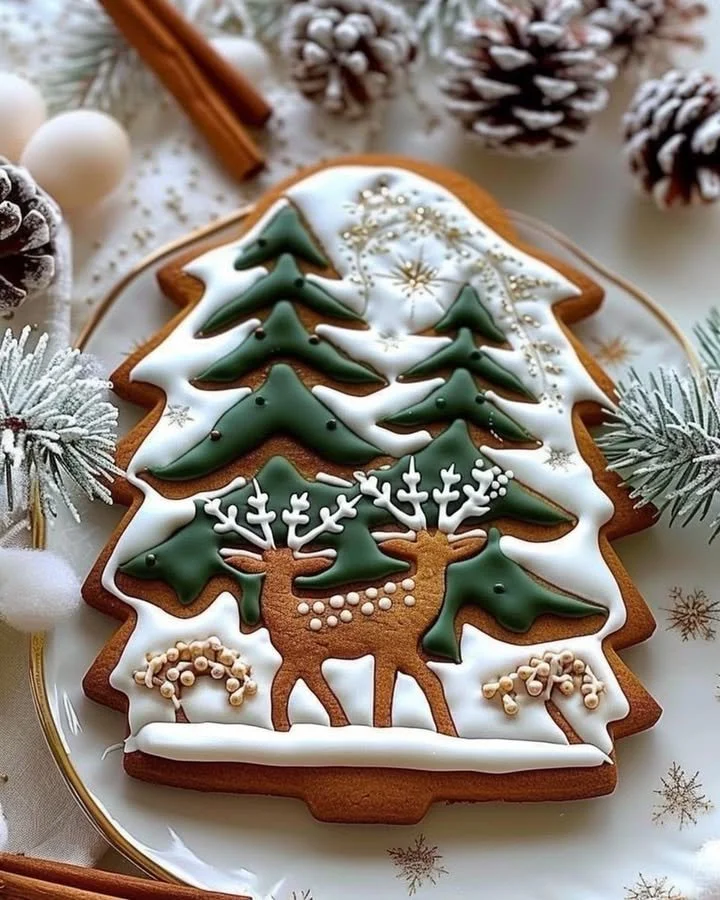
Gingerbread Cookies with Winter Forest Design are a delightful treat that brings warmth and nostalgia into your kitchen during the winter months. These cookies not only fill your home with an intoxicating aroma of spices like cinnamon, ginger, and cloves, but their intricate winter forest designs transform them into edible works of art. Perfect for family gatherings or as gifts during the holiday season, these cookies are fun to make and a joy to share. This step-by-step recipe will guide you through creating these stunning confections that taste just as good as they look.
Why You’ll Love This Recipe
There are many reasons to adore this Gingerbread Cookies with Winter Forest Design recipe. First, the preparation is effortless; even novice bakers will have no trouble following these straightforward directions. With a minimal ingredient list, you can whip up a batch of cookies that will impress everyone. Additionally, these cookies are easily customizable—whether you prefer classic gingerbread shapes or want to get creative with winter-themed designs, the options are endless. The engaging decorating process makes it a wonderful family activity, ensuring joy and laughter in the kitchen.
Ingredients
To create the perfect Gingerbread Cookies with Winter Forest Design, gather the following ingredients:
- 3 1⁄4 cups all-purpose flour
- 3⁄4 teaspoon baking soda
- 1 tablespoon ground ginger
- 1 tablespoon ground cinnamon
- 1⁄4 teaspoon ground cloves
- 1⁄4 teaspoon nutmeg
- 1⁄2 teaspoon salt
- 1⁄2 cup unsalted butter, softened to a creamy consistency
- 1⁄2 cup packed brown sugar, rich and aromatic
- 1 large egg
- 2⁄3 cup unsulfured molasses, bringing deep flavor
- 1 teaspoon pure vanilla extract for a hint of sweetness
- 3 cups powdered sugar
- 2 large egg whites or 3 tablespoons meringue powder mixed with 6 tablespoons water
- 1⁄2 teaspoon vanilla or almond extract
- Gel food coloring (green, white, brown, and optional blue for the winter theme)
- Edible gold dust (optional for the deer)
- Fine sugar or edible glitter for a shimmering snow effect
- Small brush for detailing
- Piping bags and small piping tips (round and leaf tips)
These ingredients come together to create cookies that are not only savory and sweet but visually stunning, capturing the magic of a winter forest.
Step-by-Step Directions
Mixing the Dry Ingredients: In a medium bowl, whisk together the all-purpose flour, baking soda, ground ginger, cinnamon, cloves, nutmeg, and salt. Set aside to let the spices blend beautifully.
Creaming the Butter and Sugar: In a large bowl, cream the softened butter and brown sugar together until the mixture is light and fluffy. This process is key to achieving a soft cookie texture. Add the egg, molasses, and vanilla extract, mixing until well combined for a luscious dough.
Combining the Ingredients: Gradually add the dry ingredients to the wet mixture, stirring until a dough forms. If the dough seems too sticky, sprinkle in a little more flour until it’s firm enough to handle.
Chilling the Dough: Divide the dough into two portions, wrap each in plastic wrap, and chill in the fridge for at least 1 hour. This step is important for easier rolling and cutting.
Preheating the Oven: Preheat your oven to 350°F (175°C) and line your baking sheets with parchment paper, ensuring easy release for your cookies.
Rolling Out the Dough: On a lightly floured surface, roll out one portion of the chilled dough to about 1⁄4-inch thickness. Use cookie cutters to create your desired shapes—trees, deer, snowflakes, and more.
Baking the Cookies: Place the cookie cutouts onto the prepared baking sheets and bake for 8-10 minutes, or until the edges are lightly golden. Keep an eye on them for the best results!
Cooling the Cookies: Let the cookies cool on the baking sheets for a few minutes before transferring them to a wire rack. Allow full cooling to avoid melting your decorative icing.
Preparing the Royal Icing: To make the royal icing, beat the egg whites (or meringue powder mixture) until stiff peaks form. Gradually add the powdered sugar and vanilla extract, continuing to beat until the icing is smooth and holds its shape.
Coloring the Icing: Divide the icing into separate bowls and add gel food coloring to create stunning shades—green for the trees, brown for the deer, white for snow, and more for a whimsical design.
Piping the Royal Icing: Use piping bags fitted with small tips to pipe the royal icing onto the cookies, intricately crafting your winter forest design. Let your creativity flow!
Adding Finishing Touches: Add edible gold dust to the deer for a magical effect, and sprinkle fine sugar or edible glitter over the cookies for a snowy finish. Use a small brush to add detail and make your designs pop.
Letting the Icing Dry: Allow the royal icing to dry completely before serving or packaging the cookies. This ensures your designs hold nicely and are ready to impress.
Tips & Tricks
To ensure your Gingerbread Cookies with Winter Forest Design turn out beautifully, consider these extra tips: use room-temperature butter for easier creaming, chill your dough if it warms up too much during handling, and feel free to experiment with different shapes and colors. For added flavor, consider incorporating citrus zest into the dough or using flavored extracts such as almond or lemon. Finally, when decorating, take your time—making these cookies should be a fun and relaxing experience.
Serving Suggestions & Pairings
These Gingerbread Cookies are perfect for various occasions, from holiday parties to cozy family gatherings. Serve them alongside a warm cup of tea or hot cocoa to enhance the festive spirit. They also make wonderful gifts, beautifully packaged in decorative boxes or tins. Consider pairing them with other holiday treats like spiced nuts or fruitcake to create a delightfully sweet spread for your guests.
Nutritional Information
These delicious cookies are about 100 calories each, making them a delightful treat without going overboard. Each cookie offers a balance of carbohydrates and a hint of protein from the egg and egg whites. While they’re a sweet indulgence, remember that moderation is key. Pair them with a healthy snack like fresh fruit to maintain balance in your diet during the festive season.
Storing Tips & Variations
To store your Gingerbread Cookies effectively, keep them in an airtight container at room temperature for up to a week. For longer storage, they can be frozen for several months—just make sure to wrap them tightly to avoid freezer burn. When it comes to variations, feel free to experiment with the spices, switch out molasses for honey or maple syrup, or even add chocolate chips for a unique twist.
Conclusion
Gingerbread Cookies with Winter Forest Design are sure to enchant everyone who encounters them. With their aromatic spices and delightful decorations, these cookies are more than just a treat—they’re a tradition. We encourage you to try this recipe and share your experiences. Gather your family, decorate to your heart’s content, and enjoy the process of baking these delightful cookies. When you take that first bite, you’ll discover they are as wonderful to eat as they are to create.
FAQs
Can I use whole wheat flour for this recipe?
Yes, you can substitute whole wheat flour for all-purpose flour, though the cookies may have a denser texture.How do I make my royal icing stiffer?
If your royal icing is too runny, gradually add more powdered sugar until you reach the desired consistency.Can I make these cookies vegan?
Yes! Substitute unsweetened applesauce or aquafaba for the egg and use a plant-based butter alternative.What if my dough is too dry?
If your dough feels too dry and crumbly, add a little more molasses or water until it achieves a workable consistency.How long can I store these cookies?
When stored in an airtight container, your Gingerbread Cookies can last up to a week at room temperature or several months in the freezer.
Gingerbread Cookies with Winter Forest Design
- Total Time: 70 minutes
- Yield: 24 servings 1x
- Diet: Vegetarian
Description
Delicious gingerbread cookies adorned with intricate winter forest designs, perfect for holiday festivities.
Ingredients
- 3 1⁄4 cups all-purpose flour
- 3⁄4 teaspoon baking soda
- 1 tablespoon ground ginger
- 1 tablespoon ground cinnamon
- 1⁄4 teaspoon ground cloves
- 1⁄4 teaspoon nutmeg
- 1⁄2 teaspoon salt
- 1⁄2 cup unsalted butter, softened
- 1⁄2 cup packed brown sugar
- 1 large egg
- 2⁄3 cup unsulfured molasses
- 1 teaspoon pure vanilla extract
- 3 cups powdered sugar
- 2 large egg whites or 3 tablespoons meringue powder mixed with 6 tablespoons water
- 1⁄2 teaspoon vanilla or almond extract
- Gel food coloring (green, white, brown, blue)
- Edible gold dust (optional)
- Fine sugar or edible glitter
- Small brush for detailing
- Piping bags and small piping tips
Instructions
- Mix the dry ingredients: whisk together the flour, baking soda, ground ginger, cinnamon, cloves, nutmeg, and salt in a medium bowl.
- Cream the butter and sugar: in a large bowl, cream the softened butter and brown sugar until light and fluffy. Add the egg, molasses, and vanilla; mix well.
- Combine the ingredients: gradually add the dry mixture to the wet, stirring until a dough forms.
- Chill the dough: wrap and chill for at least 1 hour in the fridge.
- Preheat the oven: to 350°F (175°C) and line baking sheets with parchment.
- Roll out the dough: on a floured surface, roll to 1⁄4-inch thickness and cut desired shapes.
- Bake the cookies: place on baking sheets and bake for 8-10 minutes.
- Cool on racks for a few minutes before transferring.
- Prepare the royal icing: beat egg whites (or meringue) until stiff, then add powdered sugar and vanilla.
- Color the icing: divide and add gel food coloring for desired shades.
- Pipe the royal icing onto cookies in winter forest designs.
- Add finishing touches: use gold dust and sprinkle fine sugar for a snowy effect.
- Let the icing dry completely before serving.
Notes
Use room-temperature butter for easier creaming and feel free to experiment with different shapes and colors.
- Prep Time: 60 minutes
- Cook Time: 10 minutes
- Category: Dessert
- Method: Baking
- Cuisine: American
Nutrition
- Serving Size: 1 cookie
- Calories: 100
- Sugar: 10g
- Sodium: 140mg
- Fat: 4g
- Saturated Fat: 2g
- Unsaturated Fat: 2g
- Trans Fat: 0g
- Carbohydrates: 15g
- Fiber: 0g
- Protein: 1g
- Cholesterol: 10mg


