
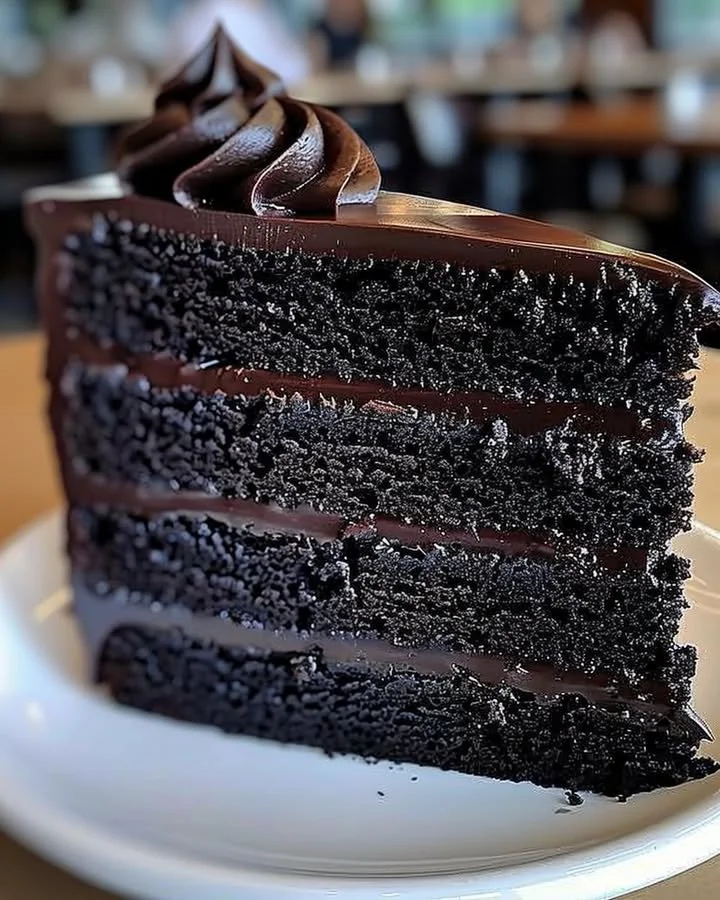
Black Velvet Cake
The seductive allure of Black Velvet Cake is enough to captivate anyone’s heart and taste buds. This exquisite recipe, filled with deep cocoa flavors and a mouthwatering blend of moist textures, deserves a prominent place in the world of desserts. With each bite, you experience a rich tapestry of sweetness and a hint of vanilla, all underpinned by the remarkable black cocoa powder that gives this cake its stunning hue. In this blog post, we will guide you through a step-by-step process to create this show-stopping cake, ensuring that your baking adventure is as delightful as the end result.
History / Fun Fact
Black Velvet Cake isn’t just any ordinary dessert; it has a fascinating history that dates back to the 1800s. The cake is believed to have originated from a desire to create a smoother, more luxurious version of traditional chocolate cake. Notably, the name "Velvet" refers to the cake’s soft, velvety texture, which was derived from the fine quality of the cocoa used. Interestingly, numerous recipes evolved over the years, many incorporating additional ingredients like buttermilk to enhance the cake’s moisture. While the original recipe likely called for more decadent elements, today’s version stays true to its roots, prioritizing flavor and texture in a way that continues to delight bakers and cake lovers alike.
Ingredients
To create your indulgent Black Velvet Cake, you’ll need the following ingredients:
- 2 cups all-purpose flour, providing a sturdy foundation for the tender layers.
- 1 cup granulated sugar for a touch of sweetness that balances the cocoa’s richness.
- 1 cup buttermilk, adding a luscious creaminess and moisture.
- 1/2 cup unsalted butter, softened to create a luxurious texture.
- 1/4 cup vegetable oil for an extra dose of moistness.
- 2 large eggs, binding the ingredients together into a cohesive batter.
- 2 tablespoons black cocoa powder, delivering that deep, dark flavor profile.
- 1 tablespoon unsweetened cocoa powder for an extra touch of chocolatey goodness.
- 1 teaspoon baking powder and 1/2 teaspoon baking soda for the perfect rise.
- 1/2 teaspoon salt to enhance all the flavors.
- 1 tablespoon white vinegar; its acidity works wonders with the buttermilk.
- 1 teaspoon vanilla extract for a beautiful depth of flavor.
- Black food coloring (gel or paste) to achieve the perfectly rich black hue you desire.
Cooking Time & Tips For Black Velvet Cake
The preparation of Black Velvet Cake leans more towards a straightforward approach, making it achievable even for newer bakers. Quick preparation is about gathering everything you need and following the steps efficiently. A slower approach allows for deeper attention to detail, like sifting the dry ingredients, the proper creaming of butter and sugar, and ensuring the perfect mixing of wet and dry.
Practical tips for ensuring success with your Black Velvet Cake include room temperature ingredients, which ensure even mixing and better texture. Sifting your dry components helps to aerate the flour, preventing any clumping, making your cake light and fluffy. Remember not to overmix the batter; a few lumps are perfectly fine and will yield a more tender crumb.
Step-by-Step Directions
Preheat your oven to 350°F (175°C). Grease and flour two 9-inch round cake pans, or line them with parchment paper to make the cakes easy to remove later.
In a large bowl, sift together the all-purpose flour, black cocoa powder, unsweetened cocoa powder, baking powder, baking soda, and salt. Set this aside, inhaling the rich chocolaty aroma that wafts through the air.
In another bowl, whisk together the buttermilk, granulated sugar, vegetable oil, softened butter, eggs, vanilla extract, and the white vinegar. This mixture will become your cake’s wet base, combining to create a seductive blend of flavors. Add a few drops of black food coloring now and get excited about the deep color this cake will take on.
Gradually add those lovely dry ingredients to your wet mixture, stirring gently until everything is just combined. Be cautious not to overmix; you want to keep your Black Velvet Cake airy and tender, not dense.
Now it’s time to pour the batter evenly into your prepared cake pans. Watch as it settles smoothly, filling the pans with promise and delight. Bake in your preheated oven for 30 to 35 minutes. You’ll know it’s done when a toothpick inserted into the center comes out clean.
Once fully cooked, allow the cakes to cool in their pans for about 10 minutes. This is your moment to gaze upon your work before transferring them to a wire rack to cool completely, allowing their wonderful fragrance to fill your kitchen.
Once the cakes are cool, it’s time to indulge yourself by frosting them with your favorite frosting, be it smooth cream cheese or a classic buttercream. Slice a generous piece and enjoy the fruits of your labor.
Serving Suggestions & Occasions
This decadent Black Velvet Cake is perfect for numerous occasions. Whether it’s a lavish birthday celebration, an elegant wedding, or a cozy gathering with friends, it never fails to impress. Pair it with a rich ganache or a light dusting of cocoa powder for an understated yet elegant presentation. You can even complement it with fresh berries or a scoop of vanilla ice cream to elevate its allure. The vibrancy of the black cake against colorful garnishes creates an inviting spectacle sure to draw guests to the dessert table.
Common Mistakes For Black Velvet Cake
One common mistake in making Black Velvet Cake is overmixing the batter. This can lead to a tough texture, which contrasts sharply with the anticipated softness. Another pitfall is not properly measuring the ingredients, particularly the flour, which should be aerated before measuring. This can affect the cake’s moisture level. Ensuring that your ingredients, such as eggs and buttermilk, are at room temperature is crucial; cold ingredients can prevent proper blending and affect the final outcome. Lastly, opening the oven door too soon can cause the cakes to collapse, so wait at least 30 minutes before checking for doneness.
Healthier Alternatives & Variations
If you’re seeking a healthier twist on this delectable treat, consider using whole wheat flour in place of all-purpose flour, which adds fiber while still maintaining a good structure. You can reduce the sugar by using a natural sweetener like honey or maple syrup, although this will change the cake’s texture slightly. For a dairy-free version, replace buttermilk with a non-dairy alternative like almond or soy milk, mixed with a splash of vinegar. To switch up the flavor, you might consider infusing the cake with espresso powder or adding chocolate chips for added texture and richness.
FAQs
Can I bake this cake in one pan instead of two?
While you can bake it in one pan, keep in mind that the baking time will need to be adjusted. It may take 10-15 minutes longer to bake.How do I store leftover Black Velvet Cake?
Keep the cake covered at room temperature for a day or in the refrigerator if you need it to last longer. However, try to consume it within a week for the best flavor and texture.Can I freeze Black Velvet Cake?
Yes! After the cake has cooled completely, wrap it tightly in plastic wrap and foil before placing it in the freezer. It can be kept for up to three months.Can I use a different type of cocoa powder?
You could use regular cocoa powder, but you will lose the deep flavor and color that black cocoa provides.What’s the best frosting for Black Velvet Cake?
While cream cheese frosting is a classic choice, a rich chocolate buttercream or even a whipped ganache pairs wonderfully with the cake’s flavors.How can I make this cake gluten-free?
You can substitute the all-purpose flour with a gluten-free baking blend, ensuring it contains xanthan gum for the best results.
Conclusion
There’s no denying that Black Velvet Cake is a true marvel for the senses, inviting you to indulge your sweet tooth with every bite. Its rich history, alluring aroma, and irresistibly moist texture come together to create an experience worth savoring. We hope our step-by-step guide encourages you to embrace this delightful recipe in your kitchen. Treat yourself and those you love to a slice of this sumptuous cake today; your taste buds will thank you!
Print
Black Velvet Cake
- Total Time: 50 minutes
- Yield: 8 servings 1x
- Diet: Vegetarian
Description
Indulge in the luxurious Black Velvet Cake, a delightful blend of deep cocoa flavors and moist textures that captivates the senses.
Ingredients
- 2 cups all-purpose flour
- 1 cup granulated sugar
- 1 cup buttermilk
- 1/2 cup unsalted butter, softened
- 1/4 cup vegetable oil
- 2 large eggs
- 2 tablespoons black cocoa powder
- 1 tablespoon unsweetened cocoa powder
- 1 teaspoon baking powder
- 1/2 teaspoon baking soda
- 1/2 teaspoon salt
- 1 tablespoon white vinegar
- 1 teaspoon vanilla extract
- Black food coloring (gel or paste)
Instructions
- Preheat your oven to 350°F (175°C). Grease and flour two 9-inch round cake pans, or line them with parchment paper.
- Sift together the all-purpose flour, black cocoa powder, unsweetened cocoa powder, baking powder, baking soda, and salt in a large bowl.
- Whisk together the buttermilk, granulated sugar, vegetable oil, softened butter, eggs, vanilla extract, and white vinegar in another bowl. Add black food coloring and mix.
- Gradually add the dry ingredients to the wet mixture, stirring gently until just combined. Avoid overmixing.
- Pour the batter evenly into the prepared cake pans.
- Bake in the preheated oven for 30 to 35 minutes, or until a toothpick inserted into the center comes out clean.
- Cool in the pans for about 10 minutes before transferring them to a wire rack to cool completely.
- Frost with your favorite frosting and enjoy!
Notes
Ensure all ingredients are at room temperature for optimal mixing. Do not overmix the batter for a tender crumb.
- Prep Time: 15 minutes
- Cook Time: 35 minutes
- Category: Dessert
- Method: Baking
- Cuisine: American
Nutrition
- Serving Size: 1 slice
- Calories: 400
- Sugar: 28g
- Sodium: 300mg
- Fat: 20g
- Saturated Fat: 10g
- Unsaturated Fat: 8g
- Trans Fat: 0g
- Carbohydrates: 50g
- Fiber: 2g
- Protein: 6g
- Cholesterol: 45mg


