
Welcome, fellow dessert lovers! Are you searching for the ultimate classic scones recipe? That elusive bake promising towering height, a tender crumb, and that perfect balance between fluffy lightness and buttery richness?
Craving That Perfect Afternoon Treat?
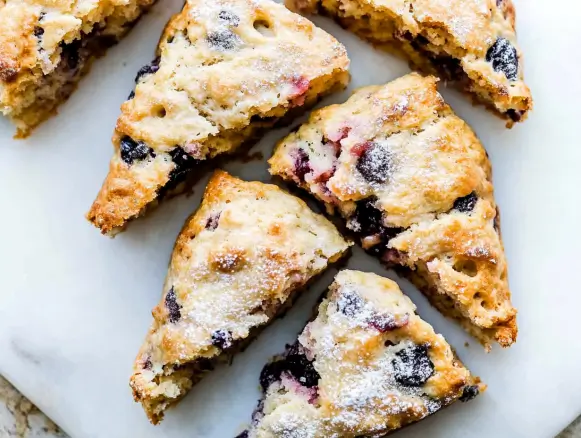
Imagine this: a crisp yet tender, golden-brown scone, still warm from the oven, breaking open with a gentle sigh to reveal a soft, steaming interior.
Is there anything more comforting, more deeply satisfying for your sweet tooth? This isn’t just any scone; it’s the quintessential British bake, the star of afternoon tea, a delightful easy dessert, and the perfect vehicle for heaps of fruity jam and decadent clotted cream.
Forget dry, crumbly disappointments – this perfect classic scones recipe is your ticket to baking bliss. Get ready to create scones that are absolutely begging to be devoured.
Ingredients: The Heart of Your Scones
Gathering your ingredients is the first step towards achieving scone nirvana. Think quality, think cold, and think love – because every good bake starts there! This isn’t just a list; it’s the curated palette for your classic scones recipe masterpiece.

| Ingredient | Quantity | Sensory/Emotional Hook |
|---|---|---|
| All-Purpose Flour | 3 cups (380g) | The fine, powdery foundation – feel the potential for lightness! |
| Granulated Sugar | 1/4 cup (50g) | Just a whisper of sweetness, letting the toppings shine. |
| Baking Powder | 4 tsp | The magic lift – promising those coveted tall, fluffy peaks. |
| Salt | 1/2 tsp | Enhances all the flavours, balancing the richness. |
| Unsalted Butter | 1/2 cup (113g) | COLD and cubed! Feel the chill – this is key for that flaky, tender texture. |
| Large Eggs | 2 | Richness and binding – the golden yolks promise a beautiful crumb. |
| Buttermilk | 1/2 cup (120ml) | Cold and tangy – the creamy secret weapon for ultimate tenderness and flavour. |
| Optional Egg Wash | 1 egg + 1 tbsp milk | For that irresistible golden, glossy finish – like a bakery hug! |
Timing: Quick Comfort or Leisurely Luxury?
How much time do you have to dedicate to this glorious classic scones recipe?
- Fast & Indulgent (Under 45 Minutes): Got a sudden craving? These scones come together surprisingly quickly! Perfect for an impromptu afternoon tea or when you need a comforting easy dessert fix now. The active prep is maybe 15-20 minutes, with baking taking another 12-15. Pure, speedy satisfaction.
- Slow & Luxurious (An hour+): Making scones can also be a mindful, relaxing process. Take your time rubbing in the butter, chilling the dough slightly before cutting, and arranging them perfectly. Savour the process, perhaps while enjoying a cup of tea. This approach makes it feel like a special occasion, maybe even prepping for a holiday treat.
How To Make Classic Scones:
Let’s bake this dreamy classic scones recipe! Follow closely for light, buttery results every time.
Step 1: Prepare the Dry Foundations
Preheat your oven to 400°F (200°C). Line a baking sheet with parchment paper – no sticky situations here! In a large bowl, whisk together the flour, sugar, baking powder, and salt. Imagine creating a fluffy cloud, ready to embrace the butter.
Step 2: Incorporate the Chilled Butter
Add the cold, cubed butter to the dry ingredients. Using your fingertips (or a pastry blender if you prefer), rub the butter into the flour mixture. Work quickly! You’re aiming for a texture resembling coarse breadcrumbs or small peas.
Think little pockets of buttery promise scattered throughout – these will create steam and lift, crucial for our perfect classic scones recipe. Avoid melting the butter with warm hands.
Step 3: Introduce the Wet Ingredients
In a separate small bowl, whisk together the eggs and the cold buttermilk until just combined. Make a well in the center of your flour-butter mixture. Pour in the wet ingredients almost all at once (reserve a tablespoon or two – you might not need it all).
Step 4: Gently Bring It All Together
Using a fork or a spatula, mix just until a soft, slightly shaggy dough begins to form. Be careful – do not overmix! Overmixing develops the gluten too much, leading to tough scones, the arch-nemesis of our classic scones recipe.
If the dough seems too dry, add the reserved buttermilk, one teaspoon at a time. It should be slightly sticky but hold together.
Step 5: Pat, Don’t Roll!
Turn the dough out onto a lightly floured surface. Gently, lovingly, bring it together with your hands and pat it into a round or rectangle about 3/4 to 1 inch thick. Again, handle it lightly – we want tenderness! Avoid using a rolling pin if you can; patting is gentler.
Step 6: Cut Your Perfect Scones
Using a 2.5-inch round cutter (or a glass rim dipped in flour), cut out your scones. Press straight down – do not twist the cutter. Twisting seals the edges and prevents that beautiful, high rise we crave.
Place the scones onto your prepared baking sheet, relatively close together (this can help them rise taller). Gently gather the scraps, pat them out again (handling minimally), and cut more scones until the dough is used up.
Step 7: The Golden Touch (Optional)
For that gorgeous, bakery-style sheen, whisk the extra egg with a tablespoon of milk. Gently brush the tops (avoiding the sides!) of the scones with this egg wash. This little step elevates the visual appeal of your best classic scones recipe.
Step 8: Bake to Golden Glory
Bake for 12-15 minutes, or until the scones are risen, beautifully golden brown, and a tester inserted into the center comes out clean. The aroma filling your kitchen? Pure, buttery heaven.
Nutritional Information (Approximate)
One glorious scone from this classic scones recipe (depending on size) will contain approximately:
- Calories: 250-300 kcal
- Note: These are undeniably a treat! Baked goods like these are best enjoyed as part of a balanced life. Savour the indulgence – sometimes, a warm, buttery scone is exactly what the soul needs. It’s a perfect sweet tooth satisfier and a wonderful holiday treat.
Healthier Alternatives & Swaps
Want to lighten things up slightly or cater to dietary needs?
- Lower Sugar: You can reduce the sugar slightly (e.g., down to 2-3 tablespoons) without drastically affecting the texture, especially if serving with sweet jam.
- Dairy-Free: Swap the butter for a good quality, cold dairy-free baking block. Use a plant-based milk (like almond or soy) mixed with 1/2 tablespoon of lemon juice or white vinegar as a buttermilk substitute (let it sit for 5 minutes to curdle slightly). Use plant-based milk for the egg wash.
- Whole Wheat: Replace up to half of the all-purpose flour with whole wheat flour for added fibre. Note that this will make the scones denser.
Serving Suggestions: Beyond Jam and Cream
While the classic pairing of strawberry jam and clotted cream (or whipped cream) is divine, don’t stop there!
- Sweet Variations: Lemon curd, marmalade, honey butter, chocolate spread.
- With Ice Cream: A warm scone with a scoop of vanilla bean ice cream and maybe a drizzle of caramel? Absolutely decadent easy dessert idea!
- Holiday Treat: Add dried cranberries and orange zest to the dough for a festive twist. Or mix in some cinnamon and serve with apple butter in the fall.
- Savoury Twist: Reduce the sugar significantly (to maybe 1 tsp) and add grated cheese (like sharp cheddar) and chopped chives to the dry ingredients for a savoury scone. Delicious with soup!

Common Mistakes to Avoid
Achieve scone perfection by sidestepping these common pitfalls:
- Overmixing the Dough: Leads to tough, chewy scones instead of light and tender ones. Mix just until combined.
- Butter Too Warm: Cold butter is essential for creating flaky layers. If your kitchen is warm, chill the flour and even the bowl.
- Twisting the Cutter: Seals the edges, hindering the rise. Press straight down.
- Rolling Too Thin: Aim for at least 3/4 inch thickness for tall scones.
- Overbaking: Results in dry scones. Bake until just golden and cooked through.
Storing Your Delicious Classic Scones
Scones are undeniably best enjoyed fresh on the day they are baked, preferably still slightly warm. However, life happens!
- Storing: Keep leftover scones in an airtight container at room temperature for up to 2 days.
- Reheating: Briefly warm them in a low oven (around 300°F/150°C) for 5-7 minutes to refresh them. Avoid the microwave, which can make them tough.
- Freezing: Yes! Freeze baked and cooled scones in an airtight container or freezer bag for up to 1 month. Thaw at room temperature or reheat gently from frozen in a low oven until warmed through. Freezing portions means you always have a classic scones recipe treat on hand!
Your Turn to Bake Bliss!
There you have it – everything you need to master the perfect classic scones recipe. That tender, buttery, slightly crumbly texture, ready for your favourite toppings, is within reach.
Can you almost taste them? That warm, comforting aroma filling your kitchen? Don’t just dream about it! Gather your ingredients, embrace the simple Csteps, and treat yourself and your loved ones to the pure joy of homemade scones.
This easy dessert is waiting to happen. Happy Baking!
Classic Scones (FAQs)
Q: Can I use self-rising flour for this classic scones recipe?
A: Yes, you can substitute self-rising flour for the all-purpose flour and baking powder. If using self-rising flour, omit the baking powder and salt called for in the recipe (as self-rising usually contains them). Check your flour packaging.
Q: Can I make these scones gluten-free?
A: You can try using a good quality gluten-free all-purpose flour blend (one designed for baking, often containing xanthan gum).
The texture might be slightly different, potentially more crumbly, but it’s worth experimenting! Follow the recipe instructions otherwise. Using almond flour alone won’t work as it lacks the necessary structure.
Q: Can I add fruit or chocolate chips?
A: Absolutely! Gently fold in about 1/2 to 3/4 cup of additions like raisins, dried cranberries, blueberries (tossed in a little flour first), or chocolate chips after mixing in the wet ingredients, just before turning the dough out. This makes for a lovely holiday treat variation.
Q: Can I freeze the uncooked scone dough?
A: Yes! Cut out the scones, place them on a baking sheet not touching, and freeze until solid. Then transfer them to an airtight container or freezer bag.
You can bake them directly from frozen, adding a few extra minutes to the baking time. This is a fantastic way to have fresh scones with minimal fuss!
Q: My scones didn’t rise much, what went wrong?
A: Several factors could be at play: check your baking powder’s expiration date (old baking powder loses potency), ensure your butter was truly cold, avoid overmixing, don’t twist the cutter, and make sure you didn’t pat the dough too thin.

Classic Scones
- Total Time: 35 minutes
- Yield: 8 servings 1x
- Diet: Vegetarian
Description
A delightful classic scones recipe perfect for afternoon tea, featuring a tender crumb and buttery richness.
Ingredients
- 3 cups (380g) All-Purpose Flour
- 1/4 cup (50g) Granulated Sugar
- 4 tsp Baking Powder
- 1/2 tsp Salt
- 1/2 cup (113g) Unsalted Butter, cold and cubed
- 2 Large Eggs
- 1/2 cup (120ml) Buttermilk, cold
- 1 Egg + 1 tbsp Milk for Egg Wash (optional)
Instructions
- Preheat your oven to 400°F (200°C) and line a baking sheet with parchment paper.
- In a large bowl, whisk together the flour, sugar, baking powder, and salt.
- Add the cold, cubed butter to the dry ingredients and rub in until the mixture resembles coarse breadcrumbs.
- In a small bowl, whisk together the eggs and buttermilk. Make a well in the center of the flour mixture and pour in the wet ingredients.
- Mix gently with a fork until a soft dough begins to form. Avoid overmixing.
- Turn the dough onto a floured surface, pat it to a thickness of about 3/4 to 1 inch.
- Cut out scones using a 2.5-inch cutter, placing them on the prepared baking sheet.
- For a golden finish, brush the tops with the egg wash mixture.
- Bake for 12-15 minutes until golden brown.
Notes
Scones are best enjoyed fresh, but can be stored in an airtight container for up to 2 days. Reheat in a low oven to refresh.
- Prep Time: 20 minutes
- Cook Time: 15 minutes
- Category: Dessert
- Method: Baking
- Cuisine: British
Nutrition
- Serving Size: 1 scone
- Calories: 275
- Sugar: 8g
- Sodium: 300mg
- Fat: 14g
- Saturated Fat: 8g
- Unsaturated Fat: 4g
- Trans Fat: 0g
- Carbohydrates: 36g
- Fiber: 1g
- Protein: 6g
- Cholesterol: 70mg


