Remember that thrilling moment when you stumble upon a flavor combination so unexpected, so perfectly balanced, it makes you pause? That hesitant first bite dissolves into pure, unadulterated delight? Get ready for that feeling all over again. This Lemon-Lime Cherry Pistachio Cheesecake recipe isn’t merely a dessert; it’s an edible adventure.
It’s a vibrant, surprising symphony of tastes and textures designed to awaken your palate and steal the show at any gathering. Forget the ordinary; this is the spectacular treat you didn’t even know you were searching for, ready to transform any occasion into something truly memorable.
Why You’ll Adore This Zesty, Nutty, Cherry-Kissed Cheesecake
Let’s be honest, classic cheesecake is wonderful. But sometimes, you crave something more. Something that wakes up your palate and offers a journey of flavors in every mouthful. This Lemon-Lime Cherry Pistachio Cheesecake isn’t just different; it’s thoughtfully composed.
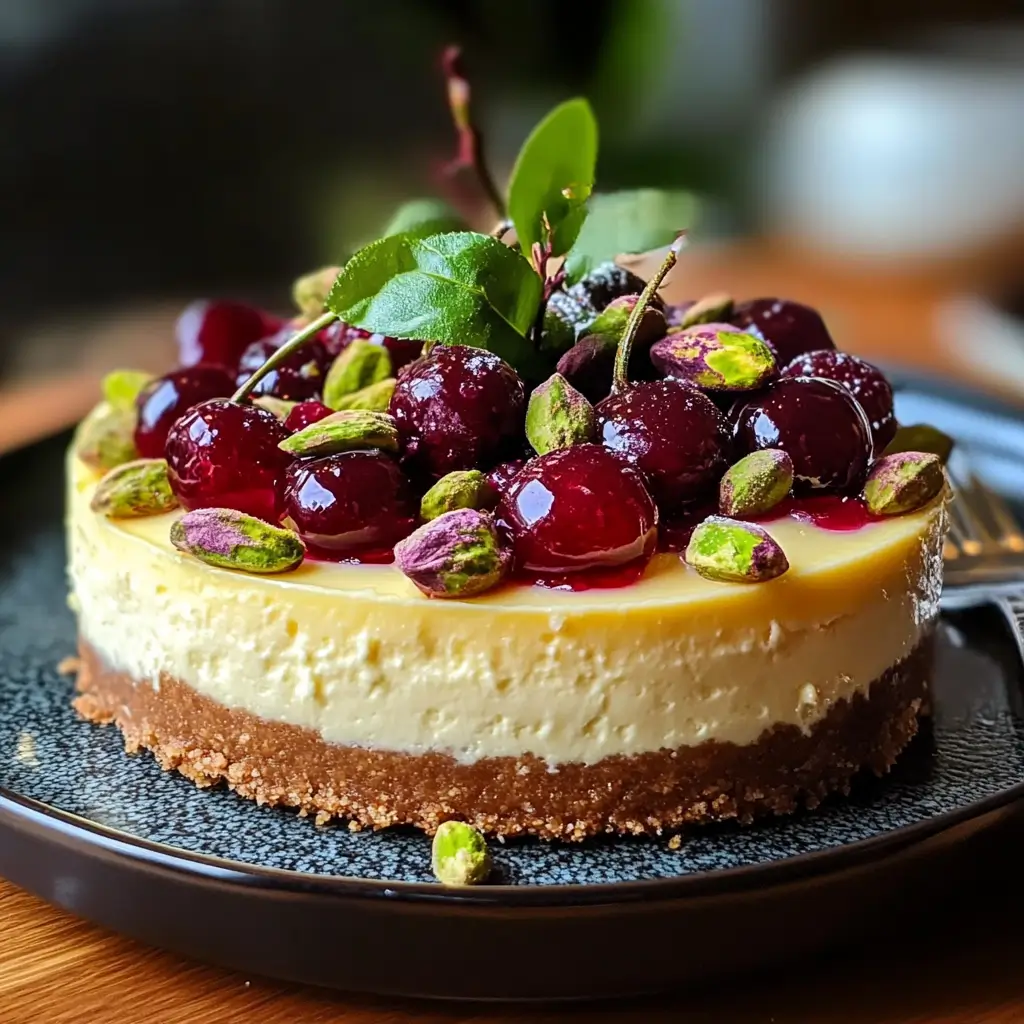
Imagine the luxurious, cool creaminess of perfectly baked cheesecake as your base. Now, infuse that with the bright, zinging tartness of both lemon and lime – a citrusy duo that cuts through the richness beautifully, keeping every bite vibrant and refreshing. Swirled within or spooned generously on top, you have pops of sweet, slightly tart cherry, adding a familiar comfort but in this exciting new context. And the foundation? A unique crust made with earthy, flavorful pistachios, lending not just a gorgeous subtle green hue but also a satisfying texture and nutty depth that complements the other elements perfectly.
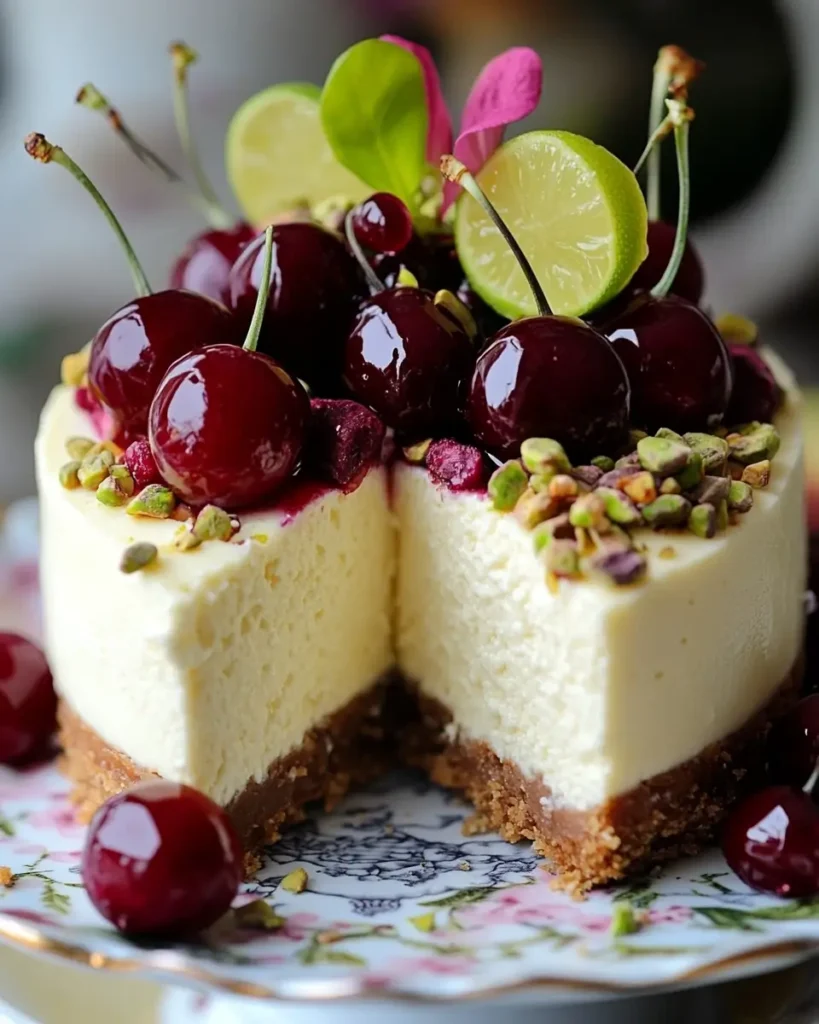
It’s a showstopper visually, too – the pale creamy filling, the vibrant cherry, the speckled green crust, perhaps adorned with extra nuts and zest. This is the dessert you bring out for special occasions, holiday gatherings, or simply those moments when you want to treat yourself and your loved ones to something truly memorable. It’s a unique cheesecake flavor profile that feels both gourmet and utterly comforting.
Gathering Your Arsenal: Ingredients for Success
Great baking starts with great ingredients. For this recipe, paying attention to quality makes a real difference. Using full-fat dairy ensures the richest, creamiest texture, and freshly squeezed citrus juice is non-negotiable for that bright, authentic tang. And please, let your cold ingredients come to room temperature – it’s the secret handshake for lump-free cheesecake!
Pistachio Crust:
- 1 ½ cups Shelled, unsalted pistachios
- ½ cup Graham cracker crumbs (about 4-5 full crackers)
- ¼ cup Granulated sugar
- 6 tbsp Unsalted butter, melted
Lemon-Lime Filling:
- 32 oz (four 8-oz packages) Full-fat cream cheese, softened to room temperature (very important!)
- 1 ¾ cups Granulated sugar
- 4 Large eggs, room temperature
- 1 cup Full-fat sour cream, room temperature
- ¼ cup Freshly squeezed lemon juice
- ¼ cup Freshly squeezed lime juice
- 1 tbsp Lemon zest (from about 1 large lemon)
- 1 tbsp Lime zest (from about 2 limes)
- 1 tsp Pure vanilla extract
- (Optional, for extra structure) 2 tbsp All-purpose flour
Cherry Swirl/Topping:
- 2 cups Fresh or frozen cherries, pitted (if frozen, don’t thaw first)
- ½ cup Granulated sugar (adjust based on cherry sweetness)
- 1 tbsp Lemon juice
- 1 tbsp Cornstarch mixed with 2 tbsp cold water (slurry)
- For Garnish: Chopped pistachios, extra citrus zest
Building the Foundation: Crafting the Perfect Pistachio Crust
This nutty base sets the stage. It’s simpler than you think and adds so much character.
- Prep Your Pan: Lightly grease a 9-inch springform pan. You might also want to line the bottom with parchment paper for easier removal later.
- Process the Nuts & Crumbs: In a food processor, pulse the pistachios until they are finely ground, but stop before they turn into butter. Add the graham cracker crumbs and ¼ cup sugar; pulse briefly to combine.
- Add Butter: Pour the melted butter over the crumb mixture and pulse until it’s evenly moistened, resembling wet sand.
- Press into Pan: Tip the mixture into your prepared springform pan. Using the flat bottom of a measuring cup or glass, press the crumbs firmly and evenly across the bottom of the pan. You can press them slightly up the sides (about ½ inch) if you like that look.
- Chill: Place the crust in the freezer for about 15-20 minutes (or the refrigerator for 30 minutes) to firm up while you prepare the filling. This helps prevent a soggy bottom. You can pre-bake it at 350°F (175°C) for 8-10 minutes for extra crispness, but let it cool completely before adding the filling.
The Heart of the Matter: Creating the Dreamy Lemon-Lime Filling
The secret to unbelievably creamy cheesecake? Patience and temperature. Don’t rush these steps!
- Beat the Cream Cheese: Place the truly softened cream cheese in the bowl of your stand mixer fitted with the paddle attachment (or use a large bowl and a hand mixer). Beat on medium-low speed until it’s completely smooth and creamy, with absolutely no lumps. Scrape down the sides and bottom of the bowl frequently. This step is crucial!
- Add Sugar: With the mixer on low, gradually add the 1 ¾ cups of sugar, beating until just combined and smooth. Don’t beat on high speed – you want to avoid incorporating too much air.
- Incorporate Eggs: Add the room temperature eggs one at a time, beating on low speed only until the yellow of the yolk disappears into the batter after each addition. Overmixing eggs is a primary cause of cracks!
- Stir in the Rest: Gently stir in the room temperature sour cream, fresh lemon juice, fresh lime juice, lemon zest, lime zest, and vanilla extract using a spatula or on the lowest mixer speed, just until blended.
- (Optional Flour): If using, gently stir in the flour now until just combined.
- Pour: Pour the glorious, smooth filling over your chilled crust in the springform pan. Smooth the top gently with an offset spatula.
Adding the Sweet Jewel: The Cherry Swirl or Topping
You have two lovely options here: swirl the cherry mixture into the batter before baking for an integrated look, or make a luscious topping to spoon over after chilling. We’ll detail the topping method, which lets the clean lemon-lime flavor shine through clearly in the cake itself.
- Cook Cherries: Combine the pitted cherries, ½ cup sugar (adjust if your cherries are very sweet or tart), and 1 tbsp lemon juice in a medium saucepan.
- Simmer: Bring the mixture to a simmer over medium heat, stirring occasionally. Cook for about 5-10 minutes, until the cherries soften and release their juices.
- Thicken: Whisk the cornstarch slurry (1 tbsp cornstarch + 2 tbsp cold water) until smooth. Pour it into the simmering cherries while whisking constantly. Continue to simmer for 1-2 minutes, whisking, until the sauce thickens noticeably.
- Cool Completely: Remove from heat and let the cherry topping cool completely to room temperature before using. It will thicken more as it cools. Chilling it slightly is even better before topping the cheesecake.
Baking Brilliance: Achieving Cheesecake Perfection
This is where the magic happens. A water bath might seem fussy, but it’s your best friend for a perfect cheesecake texture.
- Preheat & Prep Water Bath: Preheat your oven to 325°F (160°C). Bring a kettle of water to a boil. Take your springform pan (with crust and filling) and wrap the outside tightly in a double layer of heavy-duty aluminum foil, ensuring no seams are near the bottom where water could seep in.
- Assemble Bath: Place the foil-wrapped pan inside a larger roasting pan. Carefully pour the hot water from the kettle into the roasting pan, making sure it comes about halfway up the sides of the springform pan. Be careful not to splash water onto the cheesecake batter.
- Bake: Carefully transfer the roasting pan setup into the preheated oven. Bake for 60-75 minutes. The cheesecake is done when the edges are set and appear slightly puffed, but the very center (about a 3-inch circle) still has a slight jiggle or wobble when you gently nudge the pan. Don’t overbake!
- Cool Gradually (Crucial!): Turn the oven off. Prop the oven door open slightly with a wooden spoon handle. Let the cheesecake cool slowly in the cooling oven for 1 hour. This gradual temperature change is key to preventing cracks.
- Cool Completely: Remove the cheesecake from the water bath (carefully lift it out, remove the foil) and let it cool completely on a wire rack at room temperature (another 1-2 hours).
- Chill Thoroughly: Once completely cool, cover the cheesecake loosely with plastic wrap (don’t let it touch the surface yet) and refrigerate for at least 6 hours, but preferably overnight. This allows the flavors to meld and the texture to set perfectly.
The Grand Finale: Serving and Storing Your Masterpiece
The moment you’ve been waiting for!
- Release: Before serving, run a thin, flexible knife or offset spatula around the edge of the cheesecake to loosen it from the sides of the springform pan. Carefully release and remove the outer ring.
- Garnish: Spoon the cooled cherry topping over the cheesecake. Sprinkle generously with chopped pistachios and a little extra fresh lemon or lime zest for a pop of color and aroma.
- Slice Like a Pro: For clean slices, dip a large, sharp knife into hot water, wipe it dry, then make a cut. Repeat heating and wiping the knife before each slice.
- Store: Keep any leftover cheesecake tightly covered with plastic wrap or in an airtight container in the refrigerator. It will remain delicious for 3-4 days.
Conclusion: Your Slice of Cheesecake Heaven Awaits
You did it! You’ve created not just a dessert, but an experience. This Lemon-Lime Cherry Pistachio Cheesecake is a testament to how beautiful ingredients and a little care can result in something truly special. That first bite – the cool, creamy tang yielding to sweet cherry and the satisfying crunch of pistachio – is pure bliss. It’s complex, yet harmonious; elegant, yet joyfully satisfying.
Ready to bake this incredible Lemon-Lime Cherry Pistachio Cheesecake Recipe? Gather your ingredients, embrace the process, and let the magic begin! Don’t forget to leave a comment below and tell us how yours turned out, or share your masterpiece on social media and tag us! We love seeing your creations!
Lemon-Lime Cherry Pistachio Cheesecake Recipe FAQs
Answer: Absolutely, and you should! Cheesecake needs time to chill and fully set for the best texture and flavor. Making it a day or even two days before you plan to serve it is ideal. Just keep it well-covered in the fridge.
Answer: Absolutely, and you should! Cheesecake needs time to chill and fully set for the best texture and flavor. Making it a day or even two days before you plan to serve it is ideal. Just keep it well-covered in the fridge.
Answer: Your delicious leftovers should be stored tightly covered – either with plastic wrap pressed gently onto any cut surfaces or in an airtight container – in the refrigerator. Enjoy it within 3 to 4 days for optimal freshness.
Answer: Yes, you certainly can! While pistachios offer that unique flavor pairing and lovely color, walnuts or pecans would also make a delicious crust. Just substitute them in equal measure.
Answer: While you can bake it without one, a water bath is highly recommended for this Lemon-Lime Cherry Pistachio Cheesecake Recipe. It creates a steamy oven environment, promoting gentle, even baking. This results in a supremely creamy texture and is your best defense against surface cracks.
Answer: For the absolute best, brightest, and most vibrant citrus flavor – which is central to this recipe – freshly squeezed juice is strongly recommended. Bottled juice often has preservatives or a slightly muted taste that won’t pop quite as much. In a real pinch, you could use it, but fresh makes a noticeable difference here.

Lemon-Lime Cherry Pistachio Cheesecake
- Total Time: 465 minutes
- Yield: 12 servings 1x
- Diet: Vegetarian
Description
A vibrant, nutty cheesecake infused with the bright flavors of lemon and lime, swirled with sweet cherry and set on a delicious pistachio crust.
Ingredients
- 1 ½ cups Shelled, unsalted pistachios
- ½ cup Graham cracker crumbs (about 4–5 full crackers)
- ¼ cup Granulated sugar
- 6 tbsp Unsalted butter, melted
- 32 oz Full-fat cream cheese, softened to room temperature
- 1 ¾ cups Granulated sugar
- 4 Large eggs, room temperature
- 1 cup Full-fat sour cream, room temperature
- ¼ cup Freshly squeezed lemon juice
- ¼ cup Freshly squeezed lime juice
- 1 tbsp Lemon zest
- 1 tbsp Lime zest
- 1 tsp Pure vanilla extract
- 2 tbsp All-purpose flour (optional)
- 2 cups Fresh or frozen cherries, pitted
- ½ cup Granulated sugar (for cherries)
- 1 tbsp Lemon juice (for cherries)
- 1 tbsp Cornstarch mixed with 2 tbsp cold water (for cherries)
- Chopped pistachios and extra citrus zest for garnish
Instructions
- Preheat your oven to 325°F (160°C).
- Prepare a 9-inch springform pan with a light greasing and optional parchment paper at the bottom.
- In a food processor, pulse pistachios until finely ground. Add graham cracker crumbs and sugar, pulse to combine.
- Add melted butter to the crumb mixture and pulse until it resembles wet sand. Press firmly into the bottom and slightly up the sides of the springform pan.
- Chill crust in the freezer for 15-20 minutes or refrigerate for 30 minutes.
- In a stand mixer, beat softened cream cheese until smooth and lump-free. Gradually add sugar, then add eggs one at a time, mixing on low speed.
- Stir in sour cream, lemon juice, lime juice, zests, and vanilla extract until well combined. If using flour, gently stir it in now.
- Pour the cheesecake filling over the chilled crust and smooth the top.
- In a saucepan, combine cherries, sugar, and lemon juice. Bring to a simmer for 5-10 minutes until softened.
- Whisk cornstarch slurry into the cherry mixture and simmer for 1-2 minutes until thickened. Cool completely.
- Wrap the springform pan in heavy-duty aluminum foil and place it in a larger roasting pan filled with hot water halfway up the sides.
- Bake for 60-75 minutes until edges are set but the center has a slight jiggle.
- Turn off the oven, slightly open the door, and let the cheesecake cool inside for 1 hour.
- Cool completely on a wire rack, then refrigerate for at least 6 hours or overnight.
- Before serving, top with cooled cherry mixture and garnish with chopped pistachios and zest.
- Slice with a hot knife for clean cuts and enjoy!
Notes
For the best texture, allow the cheesecake to chill overnight before serving. Use fresh citrus juice for maximum flavor.
- Prep Time: 30 minutes
- Cook Time: 75 minutes
- Category: Dessert
- Method: Baking
- Cuisine: American
Nutrition
- Serving Size: 1 slice
- Calories: 400
- Sugar: 28g
- Sodium: 350mg
- Fat: 27g
- Saturated Fat: 14g
- Unsaturated Fat: 10g
- Trans Fat: 0g
- Carbohydrates: 36g
- Fiber: 3g
- Protein: 8g
- Cholesterol: 80mg

